
MySQL là hệ quản trị cơ sở dữ liệu tự do nguồn mở phổ biến nhất thế giới và được các nhà phát triển rất ưa chuộng trong quá trình phát triển ứng dụng. MySQL là một trong những ví dụ rất cơ bản về Hệ Quản trị Cơ sở dữ liệu quan hệ sử dụng Ngôn ngữ truy vấn có cấu trúc (SQL).

Cài đặt MySQL 5.7.9 trên Linux
Bài viết sau sẽ hướng dẫn các bạn cài MySQL 5.7.9 trên RHEL/CentOS 7/6/5 và Fedora 23/22/21 sử dụng MySQL Yum repository bằng lệnh YUM.
Bước 1: Thêm MySQL Yum Repository
1. Hướng dẫn này dùng để cài đặt lên hệ điều hành Linux chưa có MySQL, nếu đã cài MySQL từ nguồn khác, các bạn nên nâng cấp hoặc thay thếbằng phiên bản từ MySQL Yum Repository.
Trước khi thực hiện đừng quên sao lưu database nhé.
2. Thêm MySQL Yum repository vào hệ thống để cài đặt MySQL.
--------------- On RHEL/CentOS 7 ---------------
# wget http://dev.mysql.com/get/mysql57-community-release-el7-7.noarch.rpm
--------------- On RHEL/CentOS 6 ---------------
# wget http://dev.mysql.com/get/mysql57-community-release-el6-7.noarch.rpm
--------------- On RHEL/CentOS 5 ---------------
# wget http://dev.mysql.com/get/mysql57-community-release-el5-7.noarch.rpm
--------------- On Fedora 23 ---------------
# wget http://dev.mysql.com/get/mysql57-community-release-fc23-7.noarch.rpm
--------------- On Fedora 22 ---------------
# wget http://dev.mysql.com/get/mysql57-community-release-fc22-7.noarch.rpm
--------------- On Fedora 21 ---------------
# wget http://dev.mysql.com/get/mysql57-community-release-fc21-7.noarch.rpm
3. Sau khi tải xong, tiếp theo sẽ dùng lệnh yum để cài đặt.
--------------- On RHEL/CentOS 7 ---------------
# yum localinstall mysql57-community-release-el7-7.noarch.rpm
--------------- On RHEL/CentOS 6 ---------------
# yum localinstall mysql57-community-release-el6-7.noarch.rpm
--------------- On RHEL/CentOS 5 ---------------
# yum localinstall mysql57-community-release-el5-7.noarch.rpm
--------------- On Fedora 23 ---------------
# dnf localinstall mysql57-community-release-fc23-7.noarch.rpm
--------------- On Fedora 22 ---------------
# dnf localinstall mysql57-community-release-fc22-7.noarch.rpm
--------------- On Fedora 21 ---------------
# yum localinstall mysql57-community-release-fc21-7.noarch.rpm
4. Bạn có thể kiểm tra MySQL Yum repository đã được thêm vào hệ thống hay chưa bằng lệnh sau.
# yum repolist enabled | grep "mysql.*-community.*"
# dnf repolist enabled | grep "mysql.*-community.*"      [On Fedora 22+ versions]
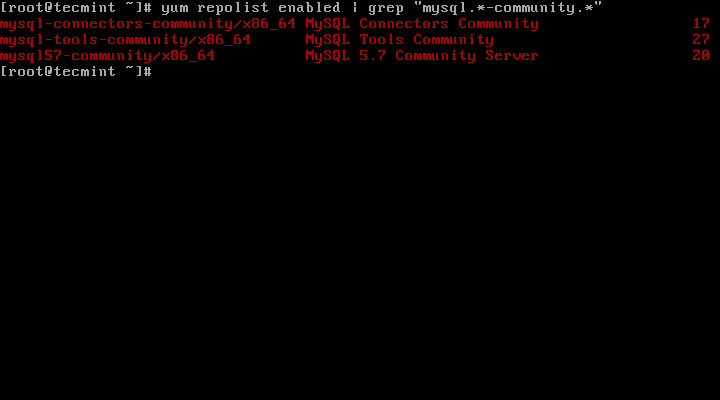
Xác nhận MySQL Yum Repository
[quangcao]
Bước 2: Cài đặt MySQL
5. Cài đặt MySQL bằng lệnh sau.
# yum install mysql-community-server
# dnf install mysql-community-server      [On Fedora 22+ versions]
Bước 3: Khởi động MySQL Server
6. Khởi động MySQL server bằng lệnh:
# service mysqld start
Kiểm tra trạng thái MySQL server
# service mysqld status
Trên Centos 7 thì sử dụng lệnh systemctl
Redirecting to /bin/systemctl status  mysqld.service
mysqld.service - MySQL Server
Loaded: loaded (/usr/lib/systemd/system/mysqld.service; enabled)
Active: active (running) since Thu 2015-10-29 05:15:19 EDT; 4min 5s ago
Process: 5314 ExecStart=/usr/sbin/mysqld --daemonize $MYSQLD_OPTS (code=exited, status=0/SUCCESS)
Process: 5298 ExecStartPre=/usr/bin/mysqld_pre_systemd (code=exited, status=0/SUCCESS)
Main PID: 5317 (mysqld)
CGroup: /system.slice/mysqld.service
└─5317 /usr/sbin/mysqld --daemonize
Oct 29 05:15:19 localhost.localdomain systemd[1]: Started MySQL Server.
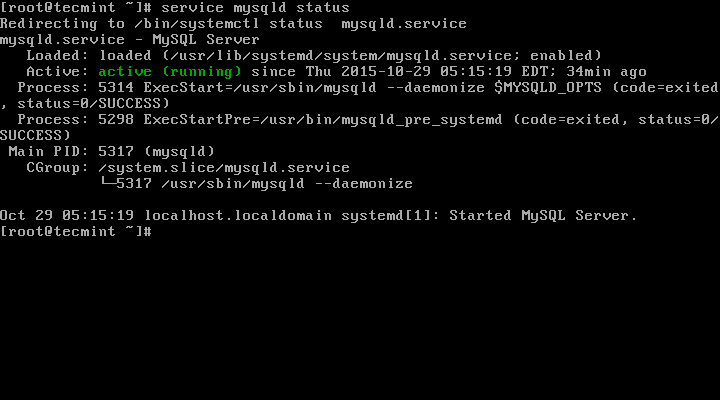
Kiểm tra trạng thái của MySQL
7. Xác nhận phiên bản đã cài bằng lệnh sau:
# mysql --version
mysql  Ver 14.14 Distrib 5.7.9, for Linux (x86_64) using  EditLine wrapper
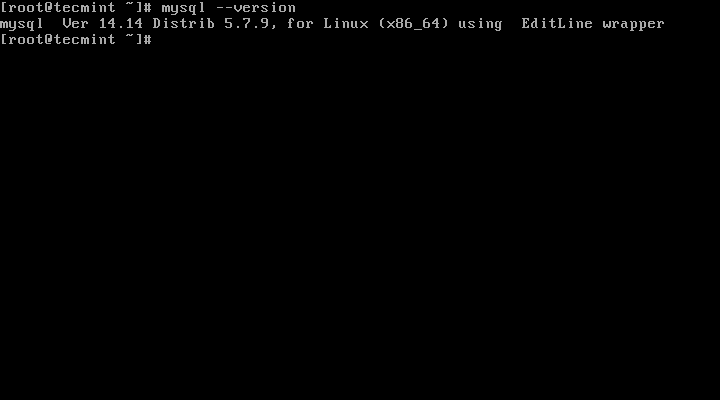
Kiểm tra phiên bản MySQL đã cài
Bước 4: Thiết lập bảo mật cho MySQL
8. Câu lệnh mysql_secure_installation cho phép bạn thiết lập bảo mật cho MySQL (cài đặt mật khẩu cho tài khoản root, xóa tài khoản vô danh (anonymous users), không cho phép tài khoản root đăng nhập trực tiếp )
Lưu ý: Sau khi cài đặt, MySQL 5.7 trở lên tự động tạo một mật khẩu ngẫu nhiên tại /var/log/mysqld.log
Sử dụng câu lệnh sau để xem mật khẩu ngẫu nhiên:
# grep 'temporary password' /var/log/mysqld.log
Sau khi biết mật khẩu ngẫu nhiên thì sử dụng lệnh sau để cài đặt bảo mật cho MySQL:
# mysql_secure_installation
Lưu ý: Sau khi điền mật khẩu ngẫu nhiên, các bạn làm theo hướng dẫn như bên dưới.
Securing the MySQL server deployment.
Enter password for user root: Enter New Root Password
VALIDATE PASSWORD PLUGIN can be used to test passwords
and improve security. It checks the strength of password
and allows the users to set only those passwords which are
secure enough. Would you like to setup VALIDATE PASSWORD plugin?
Press y|Y for Yes, any other key for No: y
There are three levels of password validation policy:
LOW    Length >= 8
MEDIUM Length >= 8, numeric, mixed case, and special characters
STRONG Length >= 8, numeric, mixed case, special characters and dictionary                  file
Please enter 0 = LOW, 1 = MEDIUM and 2 = STRONG: 2
Using existing password for root.
Estimated strength of the password: 50
Change the password for root ? ((Press y|Y for Yes, any other key for No) : y
New password: Set New MySQL Password
Re-enter new password: Re-enter New MySQL Password
Estimated strength of the password: 100
Do you wish to continue with the password provided?(Press y|Y for Yes, any other key for No) : y
By default, a MySQL installation has an anonymous user,
allowing anyone to log into MySQL without having to have
a user account created for them. This is intended only for
testing, and to make the installation go a bit smoother.
You should remove them before moving into a production
environment.
Remove anonymous users? (Press y|Y for Yes, any other key for No) : y
Success.
Normally, root should only be allowed to connect from
'localhost'. This ensures that someone cannot guess at
the root password from the network.
Disallow root login remotely? (Press y|Y for Yes, any other key for No) : y
Success.
By default, MySQL comes with a database named 'test' that
anyone can access. This is also intended only for testing,
and should be removed before moving into a production
environment.
Remove test database and access to it? (Press y|Y for Yes, any other key for No) : y
- Dropping test database...
Success.
- Removing privileges on test database...
Success.
Reloading the privilege tables will ensure that all changes
made so far will take effect immediately.
Reload privilege tables now? (Press y|Y for Yes, any other key for No) : y
Success.
All done!
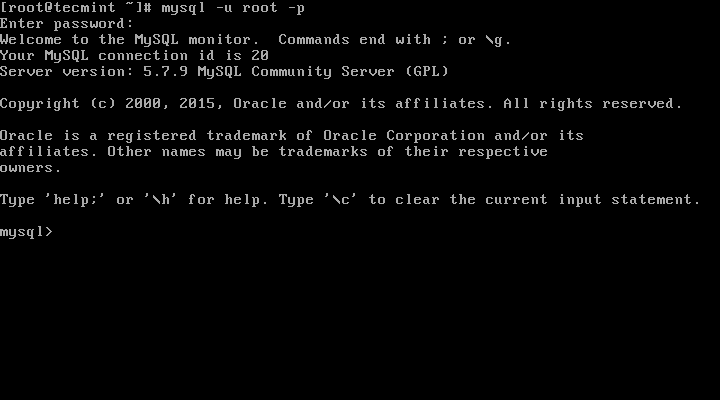
Bước 5: Kết nối MySQL Server
9. Truy cập vào MySQL bằng lệnh dưới đây:
# mysql -u root -p
Ví dụ:

Kết nối MySQL Server
Bước 6: Cập nhật MySQL với lệnh Yum
10. Ngoài cách cài mới thì bạn có thể cập nhật MySQL bằng lệnh sau:
# yum update mysql-server
# dnf update mysql-server       [On Fedora 22+ versions]
Cập nhật MySQL
Trên đây là hướng dẫn cài đặt MySQL 5.9 trên hệ điều hành Linux. Nếu gặp khó khăn trong quá trình cài đặt các bạn có thể để lại bình luận để cùng nhau thảo luận nhé 🙂
[quangcao1]
Nguồn: TecMin