
Improving your server security should be one of your top priorities, when it comes to managing a linux server. By reviewing your server logs, you may often find different attempts for brute force login, web floods, exploit seeking and many others.
With an intrusion prevention software such as fail2ban you can examine your server logs and add extra iptables rules to block problematic IP addresses.
This tutorial will show you how to install fail2ban and setup basic configuration to protect your Linux system from brute-force attacks.
Fail2ban is written in python and the only requirement is to have python installed:
- Fail2ban branch 0.9.x requires Python >=2.6 or Python >=3.2
- Fail2ban branch 0.8.x requires Python >=2.4
- Root access to your system
- Optinally, iptables or showewall and sendmail
How to Install Fail2Ban in Linux Systems
Install Fail2Ban in CentOS/RHEL 7
First update your packages, enable the Epel repository and install fail2ban as shown.
# yum update
# yum install epel-release
# yum install fail2ban
Install Fail2Ban in Debian/Ubuntu
First update your packages and install fail2ban as shown.
# apt-get update && apt-get upgrade -y
# apt-get install fail2ban
Optionally, If you wish to enable mail support (for mail notifications), you can install sendmail.
# yum install sendmail                   [On CentOS/RHEL]
# apt-get install sendmail-bin sendmail  [On Debian/Ubuntu]
To enable fail2ban and sendmail use the following commands:
# systemctl start fail2ban
# systemctl enable fail2ban
# systemctl start sendmail
# systemctl enable sendmail
How to Configure Fail2ban in Linux Systems
By default, fail2ban uses the .conf files located in /etc/fail2ban/ which are read first. However those can be overridden by .local files located in the same directory.
Thus, the .local file does not need to include all settings from the .conf file, but only the ones you wish to override. Changes should be made in the .local files not in the .conf. This will prevent overwriting changes, when upgrading the fail2ban packet.
For the purpose of this tutorial, we will copy the existing fail2ban.conf file to fail2ban.local.
# cp /etc/fail2ban/fail2ban.conf /etc/fail2ban/fail2ban.local
Now you can make the changes in the .local file by using your favorite text editor. The values you can edit are:
- loglevel – this is the level of detail to be logged. Possible options are:
- CRITICAL
- ERROR
- WARNING
- NOTICE
- INFO
- DEBUG
- logtarget – log the actions in specific file. The default value is /var/log/fail2ban.log. You can however change this to:
- STDOUT – output any data
- STDERR – otuput any errors
- SYSLOG – message based logging
- File – output to a file
- socket – directory in which socket file will be placed.
- pidfile – location of the pidfile.
Configure Fail2ban jail.local
One of the most important files in fail2ban is jail.conf which defines your jails. This is where you define the services for which fail2ban should be enabled.
As we mentioned earlier .conf files can be altered during upgrades, thus you should create a jail.local file where you can apply your modifications.
Another way to do this is to simply copy the .conf file with:
# cp /etc/fail2ban/jail.conf /etc/fail2ban/jail.local
In case you are using CentOS or Fedora, you will need to change the backend in jail.local from “auto” to “systemd”.
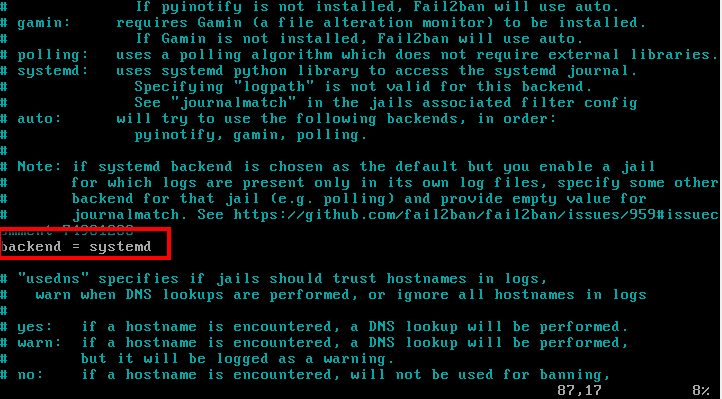
Enable Backend in Fail2ban
If you are using Ubuntu/Debian, there is no need to make this modification, even though they too use systemd.
The jail file, will enable SSH by default for Debian and Ubuntu, but not on CentOS. If you wish to enable it, simply change the following line in /etc/fail2ban/jail.local:
[sshd]
enabled = true
Ban and Retry Times
You can configure the circumstance after which an IP address is blocked. For that purpose, fail2ban use bantime, findtime and maxretry.
- bantime – this is the number of seconds that an IP address will remain banned (default 10 min).
- findtime – the amount of time between login attempts, before the host is banned. (default 10 min). In other words, if fail2ban is set to block an IP address after 3 failed login attempts, those 3 attempts, must be done within the findtime period (10 mins).
- maxretry – number of attempts to be made before a ban is applied. (default 3).
Whitelist IP Address
Of course, you will want to whitelist certain IP addresses. To configure such IP addresses open /etc/fail2ban/jail.local with your favorite text editor and uncomment the following line:
ignoreip = 127.0.0.1/8 ::1
Then, you can put the IP addresses that you want to be ignored. IP addresses should be separated with space or comma.
Email Alerts
If you wish to receive mail alerts upon event, you will have to configure the following settings in /etc/fail2ban/jail.local:
- destemail – mail address, where you will receive the notificatoin.
- Sendername – the sender that you will see when receiving the message.
- sender – email address from which fail2ban will send the emails.
The default mta (mail transfer agent) is set to sendmail.
In order to receive mail notificatoin, you will also need to change the “action” setting from:
Action = %(action_)s
To one of these:
action = %(action_mw)s
action = %(action_mwl)s
- %(action_mw)s – will ban the host and send mail with a whois report.
- %(action_mwl)s – will ban the host, provide whois info and all relevant information from the log file.
Additional Fail2ban Jail Configuration
So far we have looked at the basic configuration options. If you wish to configure a jail you will need to enable it in the jail.local file. The syntax is pretty simple:
[jail_to_enable]
. . .
enabled = true
Where you should replace jail_to_enable with the actual jail, for example “sshd”. In the jail.local file, the following values will be predefined for ssh service:
[sshd]

port = ssh
logpath = %(sshd_log)s
You can enable filter which will help identify if a line in the log is a failed one. The filter value is actually a reference to a file with the service name followed by .conf. For example: /etc/fail2ban/filter.d/sshd.conf.
The syntax is:
filter = service
For example:
filter = sshd
You can review the existing filters in the following directory: /etc/fail2ban/filter.d/.
Use fail2ban-client
Fail2ban comes with a client that can be used for reviewing and changing current configuration. Since it provides many options, you can go through its manual with:
# man fail2ban-client
Here you will see some of the basic commands you can use. To review the current status of fail2ban or for specific jail, you can use:
# fail2ban-client status
The result will look similar to this:
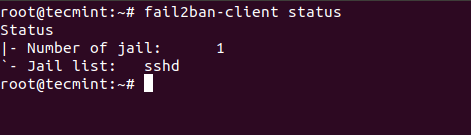
Check Fail2ban Status
For individual jail, you can run:
# fail2ban-client status sshd
In the screenshot below, you will see that I have purposely failed multiple logins so fail2ban can block the IP address from which I was trying to connect:
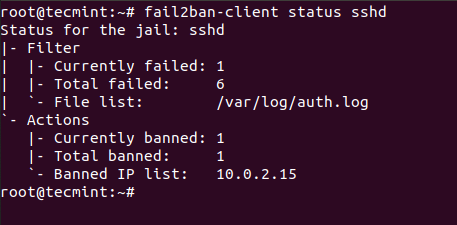
Check Fail2ban SSH Status
Conclusion
Fail2ban is an excellent, well documented intrusion prevention system, that provides extra security to your Linux system. It requires some time to get used to its setup and syntax, but once you you familiarize with it, you will feel free to change and extend its rules.