
PHP-FPM (FastCGI Process Manager) is an alternative PHP FastCGI implementation that comes with a number of extra features useful for websites of any size, particularly sites that receive high traffic.
It is commonly used in the LEMP (Linux Nginx MySQL/MariaDB PHP) stack; Nginx uses PHP FastCGI for serving dynamic HTTP content on a network. It is being used to serve millions of PHP requests for hundreds of websites on web servers on the internet.
One of the useful features of php-fpm is the built-in status page, which can help you monitor its health. In this article, we will show how to enable the PHP-FPM status page on Linux.
How to Enable PHP-FPM Status Page in Linux
$ sudo vim /etc/php-fpm.d/www.conf
OR
$ sudo vim /etc/php/7.2/fpm/pool.d/www.conf	#for PHP versions 5.6, 7.0, 7.1
Inside this file, find and uncomment the variable pm.status_path = /status as shown in the screenshot.
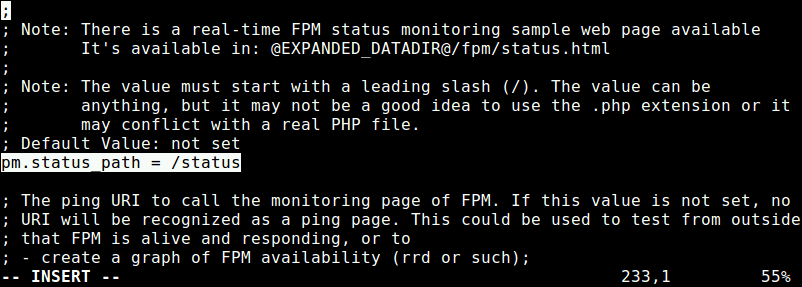
Enable PHP-FPM Status Page
Save the changes and exit the file.
Next, check that the PHP-FPM configuration file for any errors by running the command below.
$ sudo php-fpm -t
OR
$ sudo php7.2-fpm -t

Check PHP-FPM Configuration File
Then restart the PHP-FPM service to apply the recent changes.
$ sudo systemctl restart php-fpm
OR
$ sudo systemctl restart php7.2-fpm
Next, edit your default server block (virtual host) configuration file and add the location block below in it. For instance on the test system, the default server block’s config file is /etc/nginx/conf.d/default.conf, for the site test.lab.
$ sudo vim /etc/nginx/conf.d/default.conf
Here is the location block to be added. In this config, we have only allowed access to PHP-FPM process status within the localhost using the directive allow 127.0.0.1 for security reasons.
location ~ ^/(status|ping)$ {
        allow 127.0.0.1;
        fastcgi_param SCRIPT_FILENAME $document_root$fastcgi_script_name;
        fastcgi_index index.php;
        include fastcgi_params;
        #fastcgi_pass 127.0.0.1:9000;
        fastcgi_pass   unix:/var/run/php7.2-fpm.sock;
}
Save the file and close it.
Then restart the Nginx server to apply the above changes.
$ sudo systemctl restart nginx
Now open a browser and type the URL http://test.lab/status to view your PHP-FPM process status.
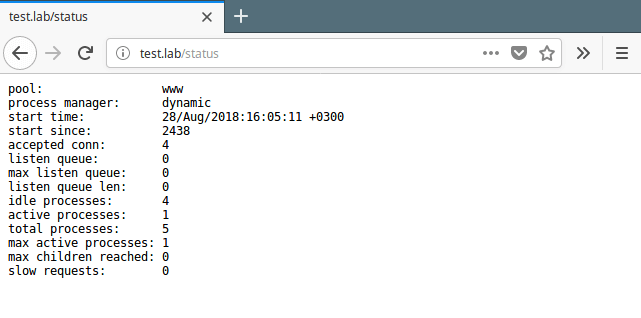
View PHP-FPM Status Page
Alternatively, use the curl program as follows, where the -L flag specifies the location of the page.
$ curl -L http://test.lab/status
By default, the status page only prints out a summary or short status. To view status for each pool process, pass “full” in the query string, for instance:
http://www.foo.bar/status?full
You can define the output format (JSON, HTML or XML) as shown.
http://www.foo.bar/status?json&full
http://www.foo.bar/status?html&full
http://www.foo.bar/status?xml&full
Below are the values returned in the php-fpm full status, for each process:
- pid – PID of the process.
- state process status (idle, running, etc.).
- start time – date and time the process has started.
- start since – number of seconds since the process has started.
- requests – number of requests the process has served.
- request duration – duration in µs of the requests.
- request method – request method (GET, POST, etc.).
- request URI – request URI with the query string.
- content length – content length of the request (only with POST).
- user – user (PHP_AUTH_USER) (or ‘-‘ if not set).
- script – main script called (or ‘-‘ if not set).
- last request cpu – %cpu the last request consumed (note that it’s always 0 if the process is not in Idle state).
- last request memory – max amount of memory the last request consumed (it’s always 0 if the process is not in Idle state).
That’s it for now! In this article, we have explained how to enable the php-fpm status page under Nginx web server. Use the feedback form below to share your thoughts with us.